Performancing Metrics

Performance blog: Web Services
Showing posts with label Web Services. Show all posts

Thursday, May 6, 2010

Testing RESTful Web Services using LoadRunner

Brief overview of RESTful web services

REST defines a set of architectural principles by which you can design Web services that focus on a system's resources, including how resource states are addressed and transferred over HTTP by a wide range of clients written in different languages. If measured by the number of Web services that use it. REST has had such a large impact on the Web that it has mostly displaced SOAP- and WSDL-based interface design because it's a considerably simpler style to use.

From the standpoint of client applications addressing resources, the URIs determine how intuitive the REST Web service is going to be and whether the service is going to be used in ways that the designers can anticipate. A third RESTful Web service characteristic is all about the URIs.


REST Web service URIs should be intuitive to the point where they are easy to guess. Think of a URI as a kind of self-documenting interface that requires little, if any, explanation or reference for a developer to understand what it points to and to derive related resources. To this end, the structure of a URI should be straightforward, predictable, and easily understood.

One way to achieve this level of usability is to define directory structure-like URIs. This type of URI is hierarchical, rooted at a single path, and branching from it are subpaths that expose the service's main areas. According to this definition, a URI is not merely a slash-delimited string, but rather a tree with subordinate and superordinate branches connected at nodes. For example, in a discussion threading service that gathers topics ranging from Java to paper, you might define a structured set of URIs like this:

http://www.myservice.org/discussion/topics/{topic}

(Refer this article written by Alex Rodriguez on RESTful webservices for more information)

Sumilating RESTful web Services using LoadRunner


REST Services can be scripted using web_custom_request by adding appropriate headers using web_add_header function before the web_custom_request.

An example for REST services script is given below.


/*********************************

web_add_header ("X-ELS-APIKey","11111");

web_add_header ("X-Forwarded-For","12.5.28.133");

web_add_header ("Accept","text/xml");

web_custom_request("web_custom_request",

"URL=http://host:8080/content/abstract/*********",

"Method=POST",

"TargetFrame=",

"EncType=text/xml; charset=iso-8859-1",

"Resource=0",

"Referer=",

"Mode=HTTP",

"Body=",

LAST);

*****************************/

If you want to verify the response manually, you need to set up the header values first in your browser.

Please find below the steps for setting up the header using mozilla firefox browser.

  • Open firefox. Click "Add-ons" from tools menu
  • Click "get Add-ons" tab.
  • Type "HTTP header" in the text box for search all add-ons and enter.
  • In search results, click on "Add to firefox" for "Modify Headers 0.6.6" and install. Now you can see "Modify Headers 0.6.6" in the extension tab.
  • Click on "Modify Headers 0.6.6" from the "Extensions" tab and select the check box for "Always on" and "Open modify header in a new tab" and close.
  • Now click "Modify headers" from the firefox tools menu and add the appropriate header name and value for your request.

Now launch the URL in the firefox browser and verify the response manually.

Also refer RESTClient  addon available for firefox to test RESTful services

Friday, April 23, 2010

Client Side certificates with LoadRunner

Many applications make use of the SSL extension to the HTTP protocol that adds an encryption layer to the HTTP stack. If performance test tool can't handle SSL then you won't be able to record any transactions.
One way of increasing security is to make use of client certificates, which can be installed into the application

client before access is permitted to an application. The certificates are provided in a number of formats (typically pfx or p12) and must be made available to your performance testing tool for successful capture and replay.
Please follow the steps below to import, export the certificate in the format recommended by LoadRunner.
 
Import Client Certificate in Browser

1. Click Start, click Control Panel, double-click Internet Options, and then click the Content tab

2. Click Certificates.

        a)The Certificates dialog box opens.
3. Click the Personal tab, and then click Import.

        a)The Certificate Import Wizard opens.
        b)On the Welcome page, click Next.

4. On the File to Import page, click Browse, select your certificate (if necessary, select your certificate type in Files of Type drop-down menu), and then click Next.

5. On the Password page, type the certificate’s password, select Mark this key as exportable, and then click Next.

6. On the Certificate Store page, select Place all certificates in the following store, browse to the Personal certificate store (if it’s not already selected), and then click Next.

7. On the Completing the Certificate Import Wizard page, click Finish.

8. Verify that the imported certificate appears in the Personal tab of the Certificates dialog box.

Export a private key

1. Under Internet Options, and then click the Content tab.

2. Click Certificates.

       a)The Certificates dialog box opens.
3. In the Certificates dialog box, click the Personal tab, select the certificate to export, and then click Export.

       a)The Certificate Export Wizard opens.
       b)On the Welcome page, click Next.

4. On the Export Private Key page, select Yes, export the private key, and then click Next.

5. On the Export File Format page, choose Personal Information Exchange – PKCS #12 (.PFX), select Include all certificates in the certification path if possible, clear the other check boxes, and then click Next.

6. On the Password page, type and retype the certificate’s password, and then click Next.

7. On the File to Export page, type the path and name of the file to export, and then click Next.

     a)The wizard will add the .pfx extension automatically.

8. On the Completing the Certificate Export Wizard page, click Finish.


Convert .PFX to .PEM format using OpenSSL

1. Download latest version of OpenSSL from OpenSSl Website

    a. http://www.openssl.org/source/

2. Convert PFX format to PEM format using the command below

a. OPENSSL PKCS12 –in <> -out <>

b. Enter the password given while exporting the certificate

c. Enter any PEM pass phase :e:g 2222

d. Reconfirm the pass phase by typing the same number again.

Open SSL
Note: SSL utility available in LoadRunner 9.5 may crash or may not work as intended. It is better to download the utility from OpenSSL website
 
WebServices Security in LoadRunner

Transport Level Security

Secure Sockets Layer (SSL) is a common transport layer approach that is used to provide encryption to message layer security. If your web service URL begins with https, SSL is automatically used.

  •  First copy the created .pem file using OpenSSL utility into LoadRunner Script folder
  • Set up the transport level security using the following function in LoadRunner
 web_set_certificate_ex("CertFilePath=testpem1111.pem",

"CertFormat=PEM",
"KeyFilePath=testpem1111.pem",
"KeyFormat=PEM",
"Password=2222", // PEM pass phase
LAST);

Note: if a web service doesn’t uses https URL then this function is not required in VuGen

Legacy Based Security

If in addition to SSL you are using message-level security (for example a username) then you must configure the security for the message separately using the Legacy/Scenario based security model (web_service_set_security) function.

When a SOAP message sends a request, those security credentials, known as security tokens, are placed in the SOAP message. When the Web server receives the SOAP request, it does not need to send additional requests to verify the integrity of the sender. The server verifies that the credentials are authentic before letting the Web Service execute the application. By not having to go back to the source of the credentials, this significantly improves the application’s scalability

VuGen allows you to create security tokens for your script. You can create multiple tokens and set their properties. After creating a token, you use it to sign or encrypt a SOAP message. When you add a security token to a SOAP message, it is added to the SOAP message in the form of an XML element in the WS-Security SOAP header.

a. LoadRunner supports different types of security tokens. The available tokens are

Username and Password, X.509 Certificate,Kerberos Ticket, Kerberos2 Ticket, Security Context Token, andDerived Token.

The information you need to provide differs for each token

b. This following is an example of legacy based security Model using User Name and Password token in LoadRunner

web_service_set_security(
SECURITY_TOKEN, "Type=USERNAME","LogicalName=DP", "UserName=XXXXXX", "Password=XXXXX", "PasswordOptions=SendPlainText", "Add=True",
LAST);

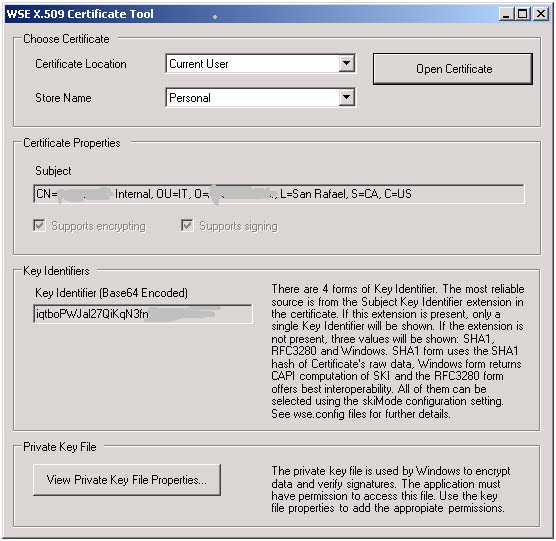
c. X.509 Certificate: When you add an X.509 token to the Vuser script, you specify the Logical Name, Store Name, Key identifier type, Key identifier value, and Store Location arguments.

These inputs to this function can be obtained by downloading Microsoft WSE X509 certificate tool from Microsoft website


web_service_set_security(
SECURITY_TOKEN, "Type=X509", "LogicalName=MyStore", "StoreName=My",
"IDType=SubjectName", "IDValue=C=US, S=CA, L=San Rafael, O=Inc., OU=IT, CN=IT Internal", "StoreLocation=CurrentUser", "Add=True",
MESSAGE_SIGNATURE, "UseToken=MyStore",
LAST);

Scenario based Security Model

LoadRunner also supports Scenario based Security Model for WCF Services which is out of scope of this post

Tuesday, January 12, 2010

SOAP Over JMS using Publisher - Subscriber Communication

Publish-Subscribe. Each message is sent from one publisher to many subscribers through a designated topic. The subscribers only receive messages sent after they have subscribed.
 
A sample script to Publish and Subcribe JMS messages to TIBCO using LoadRunner

Action()

{
//Sample Queue Name - TIBQ1.SAP.SyncOrder.ADSKOrder
jms_subscribe_topic("subcribe_step", "subscription_1", "TIBQ1.SAP.SyncOrder.ADSKOrder");

// Publishes messages to a specific topic
jms_publish_message_topic("Publish",

"\r\n \r\n "",

"7051170660\r\n "\r\n \r\n "

"2009-01-08

" 000000000025835109\r\n "

" \r\n

"TIBQ1.SAP.SyncOrder.ADSKOrder");

//Receives published messages to a specific topic on a subscription
jms_receive_message_topic("receive_step", "subscription_1", "TIBQ1.SAP.SyncOrder.ADSKOrder");

//Received messages are saved in the JMS_message parameter
lr_output_message(lr_eval_string("message : \n{JMS_message}\n"));

return 0;

}

JMS RuntimeSettings
JMS Runtime Settings

Wednesday, December 16, 2009

Wednesday, December 2, 2009

Simulating SOAP messages via JMS in LoadRunner using Web Services Protocol

Web services facilitate application to application communication for building integrated systems of web application components and HTTP is the most standard transport protocol used for the communication but it will be difficult to send messages from one subsystem to many using HTTP. Sending SOAP messages via JMS is a viable and a simple option for such requirements.


JMS is a J2EE standard for sending messages, either text or Java objects, between Java clients.


There are two scenarios for communication:


Point-to-Point. JMS implements point-to-point messaging by defining a message queue as the target for a message. Multiple senders send messages to a message queue, and the receiver gets the message from the queue.


Publish-Subscribe. Each message is sent from one publisher to many subscribers through a designated topic. The subscribers only receive messages sent after they have subscribed.


LoadRunner supports both the communication but I will focus sending SOAP over JMS point-to-point communication using LoadRunner in this post.


Vugen supports point to point by allowing you to send and receive JMS messages to and from a queue.


Please follow the steps to simulate JMS traffic to TIBCO in LoadRunner


       1.    Install JDK and set the class path accordingly

       2.    Download TIBCOjms.jar file from the application support team and set the class path of the jar in VUGEN- Runtime settings – Classpath

       3.    Request your application team to provide the following details and update in  Runtime settings

a.    JNDI Initial Context Factory - com.tibco.tibjms.naming.TibjmsInitialContextFactory (For Tibco)

b.    JNDI Provider URL

c.     JNDI Context Factory

d.    Credentials(userid/Password)


       4.    Create a Sample script to verify the connection


Action{

char text[100];

strcpy(text,"Sample Message to be Send to TIBCO");

lr_output_message("%s text is ", text);

//sending message

jms_send_message_queue("Sending message",text, "QueueName");

return 0;

}

JMS Runtime Settings for Point-to-Point
JMS Runtime Settings